Writing a movement script
Tutorial for writing a simple custom movement script.
This tutorial is part of the get started tutorial: Get Started With The A* Pathfinding Project.
We are going to write our own, really simple script for moving the AI, so open your favourite script-editor and follow.
The first thing we need to do is to calculate a path. For this we use the StartPath method on the Seeker component. The call to the Seeker is really simple, three arguments, a start position, an end position and a callback function (must be in the form "void SomeFunction (Path p)"): Path StartPath (Vector3 start, Vector3 end, OnPathDelegate callback = null)
So let's start our script with a simple snippet that starts a path request at startup: using UnityEngine;
using System.Collections;
// Note this line, if it is left out, the script won't know that the class 'Path' exists and it will throw compiler errors
// This line should always be present at the top of scripts which use pathfinding
using Pathfinding;
public class AstarAI : MonoBehaviour {
public Vector3 targetPosition;
public void Start () {
// Get a reference to the Seeker component we added earlier
Seeker seeker = GetComponent<Seeker>();
// Start to calculate a new path to the targetPosition, return the result to the OnPathComplete method.
// Path requests are asynchronous, so when the OnPathComplete method is called depends on how long it
// takes to calculate the path. Usually it is called the next frame.
seeker.StartPath(transform.position, targetPosition, OnPathComplete);
}
public void OnPathComplete (Path p) {
Debug.Log("Yay, we got a path back. Did it have an error? " + p.error);
}
}
Save it to a file in your project named AstarAI.cs and add the script to the AI GameObject.
In the inspector, change 'Target Position' to something like (-20,0,22). This is the position the AI will try to find a path to now.
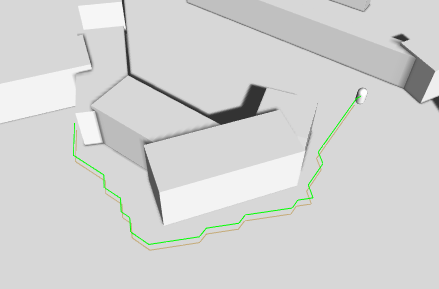
Press Play. You should get the log message and also the path should show up in the scene view as a green line (the Seeker component draws the latest path using Gizmos).
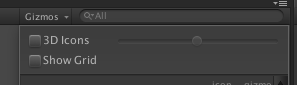
If you do not see a green line, make sure that the checkbox Show Gizmos on the Seeker component is checked. More recent Unity versions also depth-test gizmos, so it might be hidden under the ground, to disable the depth-testing click the Gizmos button above the scene view window and uncheck the '3D Icons' checkbox.
In case you get an error, make sure that the Seeker component really is attached to the same GameObject as the AstarAI script. If you still get an error, the target position might not be reachable, try to change it a bit.
See
This page explains some common error messages: Error messages.
What happens is that first the script calls the Seeker's StartPath method. The seeker will then create a new ABPath instance and then send it to the AstarPath script (the Pathfinder component you added before). The AstarPath script will put the path in a queue. As soon as possible, the script will then process the path by searching the grid, node by node until the end node is found.
For more information about how the searching step works you can take a look at this wikipedia page.
Once calculated, the path is returned to the Seeker which will post process it if any modifiers are attached and then the Seeker will call the callback function specified in the call. The callback is also sent to Seeker.pathCallback which you can register to if you don't want to specify a callback every time you call StartPath: //OnPathComplete will be called every time a path is returned to this seeker
seeker.pathCallback += OnPathComplete;
//So now we can omit the callback parameter
seeker.StartPath (transform.position, targetPosition);
Note
When disabling or destroying the script, callback references are not removed, so it is good practise to remove the callback during OnDisable in case that should happen
public void OnDisable () {
    seeker.pathCallback -= OnPathComplete;
}
When we get the calculatated path back, how can we get info from it?
A Path instance contains two lists related to that. Path.vectorPath is a Vector3 list which holds the path, this list will be modified if any smoothing is used, it is the recommended way to get a path. secondly there is the Path.path list which is a list of GraphNode elements, it holds all the nodes the path visisted which can be useful to get additonal info on the traversed path.
First though, you should always check path.error, if that is true, the path has failed for some reason. The field Path.errorLog will have more info about what went wrong in case path.error is true.
To expand our AI script, let's add some movement: Also add the CharacterController to the AI gameObject.
using UnityEngine; If you press play now, the AI will follow the calculated path, neat, eh?
// Note this line, if it is left out, the script won't know that the class 'Path' exists and it will throw compiler errors
// This line should always be present at the top of scripts which use pathfinding
using Pathfinding;
public class AstarAI : MonoBehaviour {
public Transform targetPosition;
private Seeker seeker;
private CharacterController controller;
public Path path;
public float speed = 2;
public float nextWaypointDistance = 3;
private int currentWaypoint = 0;
public float repathRate = 0.5f;
private float lastRepath = float.NegativeInfinity;
public void Start () {
seeker = GetComponent<Seeker>();
controller = GetComponent<CharacterController>();
}
public void OnPathComplete (Path p) {
Debug.Log("A path was calculated. Did it fail with an error? " + p.error);
if (!p.error) {
path = p;
// Reset the waypoint counter so that we start to move towards the first point in the path
currentWaypoint = 0;
}
}
public void Update () {
if (Time.time > lastRepath + repathRate && seeker.IsDone()) {
lastRepath = Time.time;
// Start a new path to the targetPosition, call the the OnPathComplete function
// when the path has been calculated (which may take a few frames depending on the complexity)
seeker.StartPath(transform.position, targetPosition.position, OnPathComplete);
}
if (path == null) {
// We have no path to follow yet, so don't do anything
return;
}
if (currentWaypoint > path.vectorPath.Count) return;
if (currentWaypoint == path.vectorPath.Count) {
Debug.Log("End Of Path Reached");
currentWaypoint++;
return;
}
// Direction to the next waypoint
// Normalize it so that it has a length of 1 world unit
Vector3 dir = (path.vectorPath[currentWaypoint] - transform.position).normalized;
// Multiply the direction by our desired speed to get a velocity
Vector3 velocity = dir * speed;
// Note that SimpleMove takes a velocity in meters/second, so we should not multiply by Time.deltaTime
controller.SimpleMove(velocity);
// The commented line is equivalent to the one below, but the one that is used
// is slightly faster since it does not have to calculate a square root
//if (Vector3.Distance (transform.position,path.vectorPath[currentWaypoint]) < nextWaypointDistance) {
if ((transform.position-path.vectorPath[currentWaypoint]).sqrMagnitude < nextWaypointDistance*nextWaypointDistance) {
currentWaypoint++;
return;
}
}
}
What the code does is to, in Update get the normalized direction towards the next waypoint and move towards it a bit. Then it checks if it is close enough to continue to the next waypoint, in this example that is done by simply by incrementing the currentWaypoint index. The AI will stop a short distance from the end point, but that's just because we haven't got any special logic for the last point.
This is the end of this tutorial. I recommend that you continue with the rest of the get started tutorial: Back to the get started tutorial.